Difference between revisions of "How to Install GIMX Firmware on TIAO GBoard/GIMX Adapter"

10 PCS, 10cm x 10cm, 2 layers prototype for $38.80 shipped!
(→How to Install GIMX Firmware on TIAO GBoard/GIMX Adapter) |
|||
| Line 27: | Line 27: | ||
* [https://github.com/matlo/GIMX-firmwares/releases/ GIMX firmware] | * [https://github.com/matlo/GIMX-firmwares/releases/ GIMX firmware] | ||
| − | === Install the | + | === Install the Windows Driver === |
* First we need to connect the board to your computer, use the USB to Mini USB B cable to connect the ATMEGA32U4 USB port to your PC's USB port: [[Image:gimx-firmware-connection.png|none]] | * First we need to connect the board to your computer, use the USB to Mini USB B cable to connect the ATMEGA32U4 USB port to your PC's USB port: [[Image:gimx-firmware-connection.png|none]] | ||
| Line 34: | Line 34: | ||
* Right mouse click on it and select update driver... | * Right mouse click on it and select update driver... | ||
* Select Browse my computer for driver software:[[Image:updatedriver.png|none]] | * Select Browse my computer for driver software:[[Image:updatedriver.png|none]] | ||
| − | * Use the browse button to locate the driver software: | + | * Use the browse button to locate the driver software:[[Image:driverlocation.png|none]] |
| + | * Click install [[Image:driverwarning.png:none]] | ||
| + | * Windows driver installed [[Image:driverdone.png|none]] | ||
| + | |||
| + | === Install Firmware Using Flip === | ||
| + | |||
| + | If you plan to use dfu-programmer, please skip this step and go to next step. | ||
| + | |||
| + | * Run flip software, click the chip icon to select the chip: [[Image:fliptargetdevice.png|none]] | ||
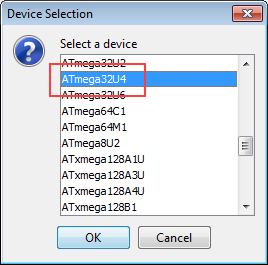
| + | * In the target device list, select ATMEGA32U4 [[Image:flipatmega32u4.png|none]] | ||
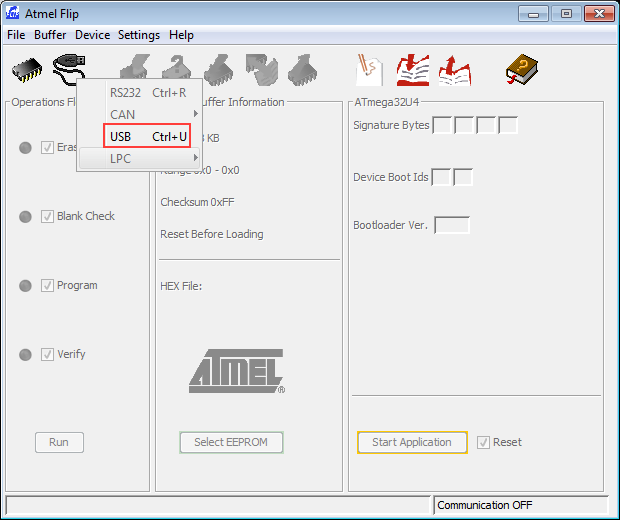
| + | * Select USB as the communication protocol [[Image:flipcomm.png|none]] | ||
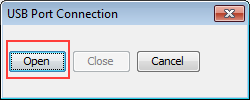
| + | * Click Open to use the USB port [[Image:flipcommopen.png|none]] | ||
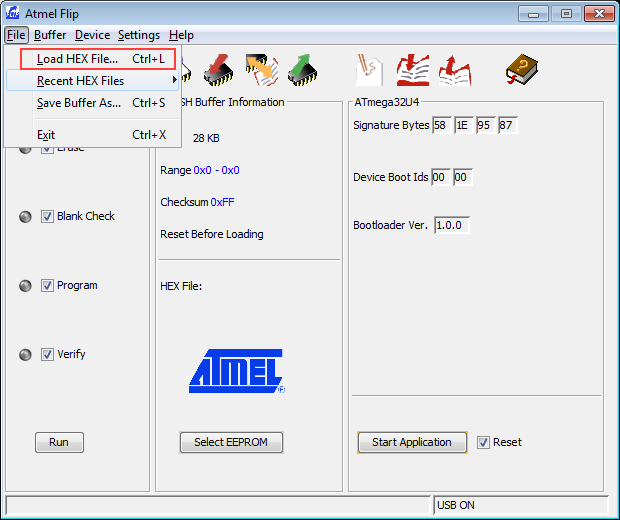
| + | * Load the HEX firmware from to Flip software so we can flash it [[Image:fliploadhex.png|none]] | ||
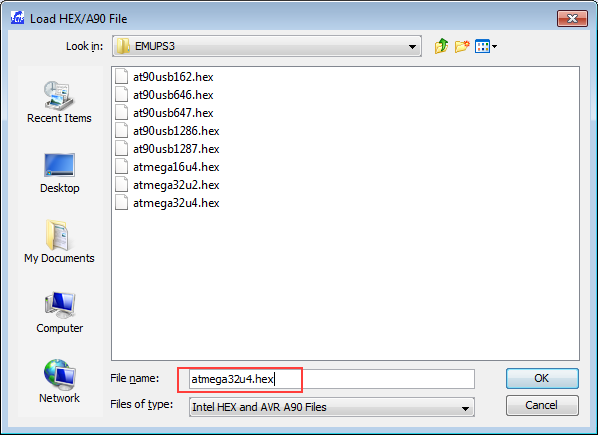
| + | * Select the firmware for ATMEGA32U4 [[Image:flipselectfw.png|none]] | ||
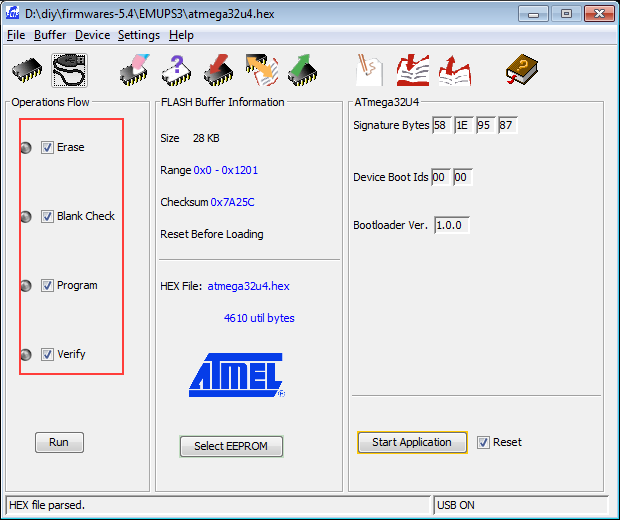
| + | * Make sure Erase, Blank Check, Program and Verify are all checked and click Run button [[Image:fliprun.png|none]] | ||
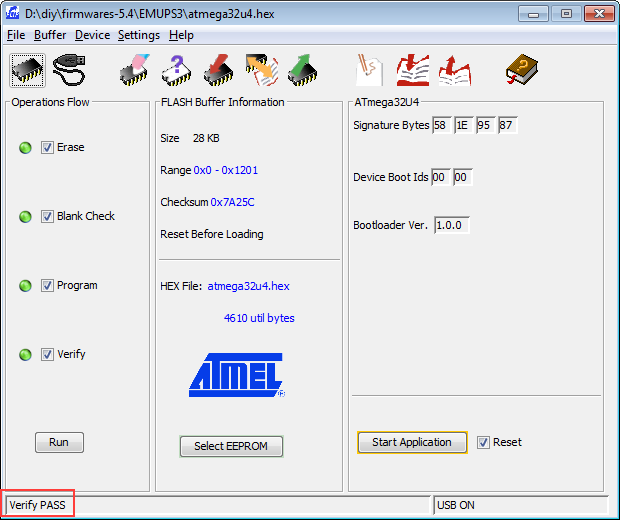
| + | * If everything goes OK, you will see this: [[Image:flipdone.png|none]] | ||
| + | * Done | ||
| + | |||
| + | === Install Firmware Using DFU-Programmer === | ||
| + | |||
| + | If you plan to use Flip, you can skip this step. | ||
| + | |||
| + | You can use the following command to install the firmware on ATMEGA32U4 using dfu-programmer: | ||
| + | |||
| + | To erase the chip: | ||
| + | <code> | ||
| + | dfu-programmer.exe atmega32u4 erase | ||
| + | </code> | ||
| + | |||
| + | To program the chip: | ||
| + | <code> | ||
| + | dfu-programmer.exe atmega32u4 flash <path to firmware> | ||
| + | </code> | ||
| + | |||
| + | To reset the chip: | ||
| + | |||
| + | <code> | ||
| + | dfu-programmer.exe atmega32u4 reset | ||
| + | </code> | ||
| + | |||
| + | For example: | ||
| + | |||
| + | [[Image:dfu-programmer-win.png|none]] | ||
| + | |||
Revision as of 11:33, 28 April 2016
Contents
Buy various JTAG cables for your Satellite Receiver, Cable Modem, Wireless Router, Standard Wiggler from http://www.easymg.com and http://www.diygadget.com
How to Install GIMX Firmware on TIAO GBoard/GIMX Adapter
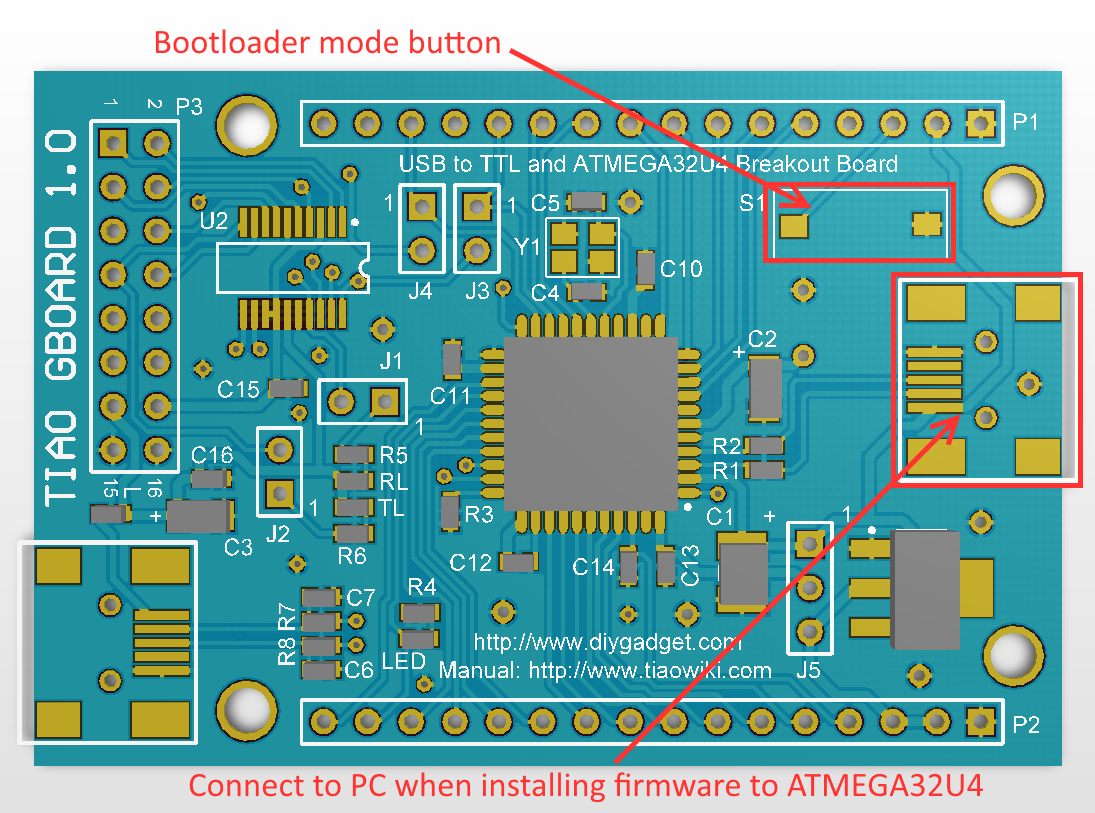
TIAO GBoard/GIMX Adapter is a combined development board, integrates USB to COM converter, and an ATMEGA32U4 chip. This is great for AVR development. However it is also very easy to use it as a GIMX adapter, no need to solder anything!
In this tutorial, we are going to show you how to install GIMX firmware on to TIAO GBoard/GIMX Adapter
Required Hardware
- A Computer (Windows or Linux,, but in this example, we focus on Windows)
- TIAO GBoard/GIMX Adapter
Required Software
- Atmel Flip or dfu-programmer
- AVR Windows Driver (it is part of Flip software, but if you want to use dfu-programmer, you need to download the driver separately)
- GIMX firmware
Install the Windows Driver
- First we need to connect the board to your computer, use the USB to Mini USB B cable to connect the ATMEGA32U4 USB port to your PC's USB port:
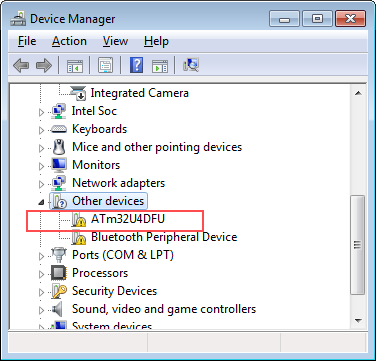
- Once the board is connected to your PC, you will notice this notification:

- Click it and you will see this:
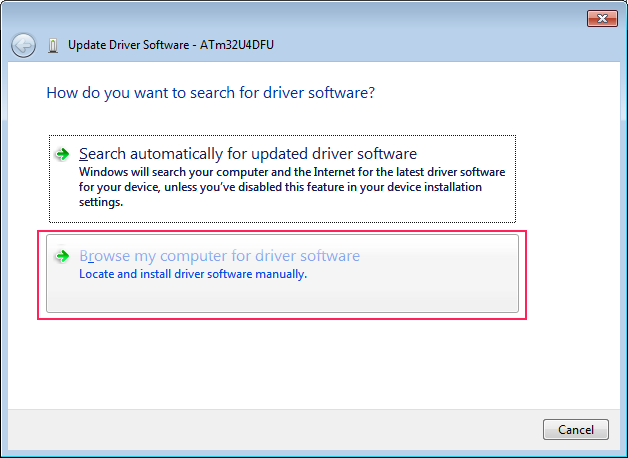
- Right mouse click on it and select update driver...
- Select Browse my computer for driver software:
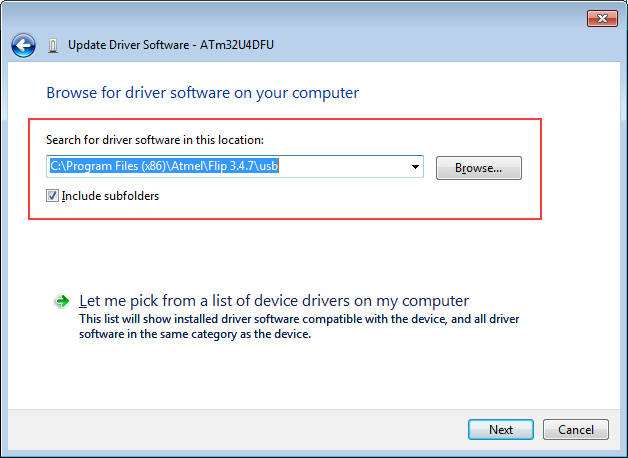
- Use the browse button to locate the driver software:
- Click install File:Driverwarning.png:none
- Windows driver installed


Install Firmware Using Flip
If you plan to use dfu-programmer, please skip this step and go to next step.
- Run flip software, click the chip icon to select the chip:
- In the target device list, select ATMEGA32U4
- Select USB as the communication protocol
- Click Open to use the USB port
- Load the HEX firmware from to Flip software so we can flash it
- Select the firmware for ATMEGA32U4
- Make sure Erase, Blank Check, Program and Verify are all checked and click Run button
- If everything goes OK, you will see this:
- Done


Install Firmware Using DFU-Programmer
If you plan to use Flip, you can skip this step.
You can use the following command to install the firmware on ATMEGA32U4 using dfu-programmer:
To erase the chip:
dfu-programmer.exe atmega32u4 erase
To program the chip:
dfu-programmer.exe atmega32u4 flash <path to firmware>
To reset the chip:
dfu-programmer.exe atmega32u4 reset
For example:

Buy various JTAG cables for your Satellite Receiver, Cable Modem, Wireless Router, Standard Wiggler from http://www.easymg.com and http://www.diygadget.com
10 PCS, 10cm x 10cm, 2 layers prototype for $38.80 shipped!